Showing posts with label Hardware. Show all posts

How to Use an HP Laptop Webcam

Use an HP Laptop Webcam
Webcams are an increasingly popular accessory for Hewlett-Packard Laptops and using them can increase your ability to communicate. Learning a little more about how to use your HP laptop webcam can make your laptop indespensible for meetings, video emails, and even gaming.

Instructions
1
Install your webcam. If you have a built-in webcam (such as on the HP Pavilion Dv5z, or HP G70t series) then skip to Step 2. Place the CD that comes with the Webcam into the disk drive. Follow the on-screen prompts and plug in your webcam only when you are told to by your program; doing otherwise may cause problems that are difficult to correct. With your webcam installed, proceed to Step 2.

2
Use MuVee Autoproducer 5. With your HP webcam on your laptop, you can use the MuVee program to record images and sound to playback later. Select "Start," then "All Programs," followed by "MuVee Autoproducer 5.0." Once the program is running, select "Tools," then "Get Video from Camera" to see the image the camera sees. You can then adjust the video using the "Device Settings" icon (it looks like a wrench with a camcorder).

Download POP3 or IMAP mailboxes (including SSL) to Exchange Server

3
Use Windows Movie Maker. Once you've recorded the images using MuVee, and saved them under the WMV file designation, you can use Windows Movie Maker to edit the images. You can not use Windows Movie Maker to record images, as you will receive an error message when attempting to use your webcam and this program together.

Click "Start," then "All Programs," followed by "Windows Movie Maker" to begin the program. To find the file you saved under MuVee's program, select "File," and then "Open" to find the video you created in MuVee.

4
Use Windows Live Messenger. You can use your webcam to talk to your friends, family, and colleagues with your Webcam and Windows Live Messenger. If it is your first time using Windows Live Messenger, you will need to download the free program. Select "Start," then "Windows Live Messenger Download." When the pop-up appears, select "Get it Free."

After the program is finished installing and is running, select ""Tools." Next, select, "Audio and Video Setup" and then "Next" to follow the on-screen prompts.

To start a session, select "Actions," then "Video," followed by the "Start a Video Call" to begin Windows Live Messenger
.

Hard Disk Failure

Broadly speaking a hard disk can fail in four ways that will lead to a potential loss of data:
Firmware Corruption / Damage to the firmware zone
Electronic Failure
Mechanical Failure
Logical Corruption


Combinations of these four types of failure are also possible. Whether the data on the hard disk is recoverable or not depends on exactly what has happened to the disk and how bad the damage is. Please note that over time, all hard disks will develop bad sectors which can lead to data loss and drive inaccessibility.

1. Firmware Corruption / Damage to the firmware zone
Explantion: Hard disk firmware is the software code that controls, and is embedded in, the physical hard drive hardware. If the firmware of a hard disk becomes corrupted or unreadable the computer is often unable to correctly interact with the hard disk. Frequently the data on the disk is fully recoverable once the drive has been repaired and reprogrammed.

Firmware failures - How to diagnose: Common Symptoms
The hard disk will spin up when powered on, but be incorrectly recognised / not recognised at all by the computer
The hard disk will spin up & be recognised correctly by the computer but the system will then hang during the boot process

Actions to take
Recovering data from hard drives with firmware failure requires low level reprogramming / manipulation of the hard drive. It is not possible for a PC repair shop to do this. Data Clinic have our own specialist equipment that allows us to successfully recover data from hard drives with firmware faults.
What is the cause of firmware corruption? We believe that one cause of damage to the firmware zone on modern drives is the use of fluid bearing technology in the spindle motor assembly (PDF)


A Maxtor DiamondMax 22. Read about Maxtor hard disk problems and fault diagnosis

A Western Digital Green series hard disk. Read our Problems and fault diagnosis on Western Digital WD hard disks

All Fujitsu MPG series drives suffer from firmware faults. Read ourFujitsu MPG / MPF series hard disk problems page.

A Seagate Barracuda 7200.11 hard disk. Read aboutfirmware faults on these 7200.11 drives

2. Electronic Failure
Explanation: Electronic failure usually relates to problems on the controller board of the actual hard disk. The computer may suffer a power spike or electrical surge that knocks out the controller board on the hard disk making it undetectable to the BIOS.

Electrical failures - How to diagnose: Common Symptom
The hard disk will not spin up when the drive is powered on - it will appear dead & not be recognised by the computer

Actions to take
Data Clinic can recover data from all types of electrical hard drive failure.


Although electronic failures can happen to any type of hard disk, we find that Quantum Fireball drives are particularly susceptible to power spikes and quite often it's possible to see visible electrical burn damage around one of the chips on the controller board. Usually, the data on the hard disk has not suffered any damage and a 100% data recovery is possible.


The Seagate Barracuda (above) and the rubber sleeved 'U' series hard disks have unique failure symptoms. Fortunately, the data is often recoverable. Read our data recovery from Seagate section for further information


A Samsung hard disk drive. We see many of these drives with electrical failures. Read more about typical symptoms on our Data Recovery from Samsung hard disk page.

A Western Digital hard disk drive. Power spikes and likewise can cause damage to the components on the controller board. Read more about Western Digital hard disk failures


Popular drives that seem to develop controller board problems: Quantum Fireball series, Western Digital drives, Maxtor drives, Fujitsu MPG and MPF series. If you have a laptop hard disk - please also refer to our laptop hard disks problems page.

3. Mechanical Failure
Mechanical hard disk failures are those which develop on components internal to the hard disk itself. Often as soon as an internal component goes faulty the data on the hard disk will become inaccessible.

Mechanical failures - How to diagnose: Common Symptoms
When powered on, the hard drive will immediately begin to make a regular ticking or clicking sound

Actions to take
Recovering data from hard drives with mechanical failure requires the drive to be worked on in a clean room as the drive has to be taken apart and investigated in lab conditions. Data Clinic have a fully equiped Class 100 clean room which we use to recover drives with mechanical problems.

Note: We see many laptop hard drives with mechanical failure. Fortunately the data is often recoverable. For specific symptoms, please read our laptop hard disk failurespage


Do not be tempted to open a hard disk if you suspect a mechanical fault: there is nothing you will be able to do and you will contaminate the internal clean air environment. There is also a good chance that during this process you will destroy any chance that we have of successfully recovering the data.


External hard disks are often dropped or knocked. Read our section on dropped / knocked external hard disk drives


The IBM Travelstar (now made by Hitachi) is a typical laptop hard disk. All laptop drives can develop mechanical failure - click ourlaptop data recovery page for further details

A Seagate hard disk drive. Click here for further details aboutSeagate hard disk failures


A Hitachi Deskstar hard disk. A very common drive that it prone to developing mechanical faults


4. Logical Errors
Often the easiest and the most difficult problems to deal with, logical errors can range from simple things such as an invalid entry in a file allocation table to truly horrific problems such as the corruption and loss of the file system on a severely fragmented drive.

Logical errors are different to the electrical and mechanical problems above as there is usually nothing 'physically' wrong with the disk, just the information on it.

Microsoft Windows Based Problems: Four common types of logical failure are shown below - please click which one applies to you or call us on 0871 977 2525


The disk in drive <x> is not formatted

Recovering data lost after a Format or FDisk

Data recovery from Ghosted or imaged hard disk drives

Data recovery from hard disks involving Scandisk and Chkdsk

Recovering and restoring data from repartitioned hard disks drives


Logical errors can also be tackled with various software tools you can buy off the net, but be warned - if you are intending to run a fix utility on your disk you can very easily make recoverable data unrecoverable. This is especially true when running ScanDisk and Chkdsk on a damaged hard drive.

If Laptop Speaker Has No Sound

Step 1: Overview Most speaker problems are due to improper settings, speaker incompatibility or out of date drivers. This tutorial will familiarize you with some of the reasons speakers malfunction and discusses the measures you will need to take to fix your laptop speaker problem.
Step 2: Check the Volume Controls

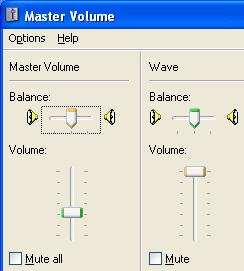
Double click the speaker icon, next to the system clock in Windows System Tray located at the bottom right hand side of the screen. Adjust the Volume Control and Wave Balance by sliding the pointer up or down. To test the volume, run a .wav or .mp3 file.
Step 3: Access the Device Manager

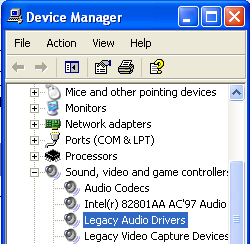
Go to Start | Settings | Control Panel. Double click on the System icon to open up the System Properties window. Select the Hardware | Device Manager tab. Click on Sound, video and game controllers to expand the view. Select the sound card driver that you have installed on your Laptop and double click it.
Step 4: Read the Device Status
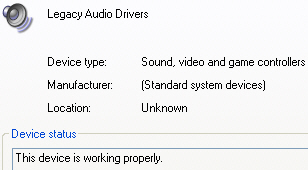
Double click on the sound driver to open up the Properties window. Click on the General tab to read the Device Status. If there is an error message in the device status, click on the Troubleshooter tab to fix the problem.
Step 5: Check the Configuration

If your sound card drivers are configured improperly or are damaged, your speakers will not function properly. You can rectify the problem by reinstalling the drivers from the disk that came with the speakers. You also can download most drivers from the manufacturer's web site.
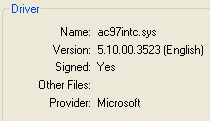
Step 6: Update the Driver Click on Start | Run and type , now click OK. The DirectX Diagnostic Tool Window will open up. Select the Sound tab. You can view the Name under Device and the Provider under Driver. You can visit the Microsoft Windows Update Web site, http://windowsupdate.microsoft.com, to check the latest version of your sound card driver. You also can download most driver updates from the manufacturer's web site.

Laptop speaker makes crackling noise

Problem description:
One of the laptop speakers make crackling noise. Reinstalling the operating system and audio driver does not fix the problem.
Possible cause:

1. Failed laptop speaker.
2. Failed sound card.

Possible troubleshooting steps and repair solution:
If one of the laptop speakers started makig crackling noise, the first thing to do is test the laptop with headphones.

If both channels in headphones sound normal and crackling noise comes only from one of the laptop speakers, you have a faulty speaker and it has to be replaced.

If you hear same crackling noise from one of the headphone channels, most likely there is a problem with the laptop sound card. In most laptops the sound card is integrated into the motherboard. If the sound card fails, you’ll have to replace the whole motheroboard.

Tips for fixing common sound problems

Here are solutions to some common sound problems on your computer. These solutions can also help if you don't hear any sound coming from your speakers or headphones, or if there's a problem with the sound you do hear. For a step-by-step tutorial to help you identify and fix common sound problems, go to No sound in Windows.Hide all

I can't hear any sound from my computer.
Try using the Playing Audio troubleshooter to fix the problem. It checks for common problems with your volume settings, your sound card or driver, and your speakers or headphones.

Open the Playing Audio troubleshooter by clicking the Start button , and then clicking Control Panel. In the search box, type troubleshooter, and then clickTroubleshooting. Under Hardware and Sound, click Troubleshoot audio playback.‌ If you're prompted for an administrator password or confirmation, type the password or provide confirmation.


Note

To make sure you have the most up-to-date troubleshooters from theWindows Online Troubleshooting Service, your computer should be connected to the Internet. For more information, see Troubleshooting in Windows.

I've run the Playing Audio troubleshooter and I still can't hear sound from my computer.


Here are some simple steps that might help you fix the problem:

Check to make sure your computer actually has a sound card, or sound processor, and it's working properly.

You must be logged on as an administrator to perform these steps.


Open Device Manager by clicking the Start button , clicking Control Panel, clicking System and Security, and then, under System, clicking Device Manager.‌ If you're prompted for an administrator password or confirmation, type the password or provide confirmation.


Double-click Sound, video and game controllers to expand that category. If a sound card is listed, you have one installed. If no sound card is listed, check the information that came with your computer to see if there's supposed to be a sound card installed. If there should be a sound card installed, you'll need to install one. See Install or remove a sound card.


Notes


If you think you have a sound card installed but you don't see it under the Sound, video and game controllers category, expand the Other devices category and check any devices listed there.


Laptops don't usually have sound cards. Instead, they have integrated sound processors, which appear in the same category in Device Manager.

If there's a yellow question mark next to the name of the sound card in Device Manager, there might be a problem.

Right-click the name of the sound card and then click Properties.

Click the General tab, and then look in the Device status box to identify problems with the sound card.

If there's a problem, you might need a new driver for your sound card. For more information, see Update a driver for hardware that isn't working properly.

If you have speakers, make sure they're plugged into a working power source and turned on.

Make sure your speakers are correctly connected to the computer.

Many computers have three or more jacks that connect to a sound card or sound processor, including a microphone jack, line-in jack, and line-out jack. Your speakers should be plugged in to the line-out jack. If you're not sure which jack this is, try plugging your speakers in to each of the jacks to see if any of them produce sound.
Microphone, line-in, and line-out jacks on a typical desktop computer


Make sure that your speaker volume or headphone volume isn't muted or turned down too low. This is particularly important for laptops, which often have small speakers that can be hard to hear.


Open Volume Mixer by clicking the Start button , clicking Control Panel, clicking Hardware and Sound, and then, under Sound, clicking Adjust system volume.


Move the slider up to increase the volume.
Make sure the Mute button is not turned on. If the button looks like this: , muting is turned off. If the button looks like this: , click it to turn off muting.


Note

Some laptops have an external volume control on the outside of the case. If you're using a laptop, check the external volume control to make sure it's not turned all the way down.

Make sure your headphones aren't plugged into the line out (headphone) jack of your sound card or computer (unless you want to be listening with headphones rather than speakers). When you plug in headphones, most computers automatically cut the sound to the speakers.

If these steps don't solve the problem, check the information that came with your computer or speakers, or go to the manufacturer's website.

I'm having trouble installing my sound card and wonder if it's compatible with Windows 7.
To find out if your hardware is compatible with Windows 7, go to the Windows 7Compatibility Center. This website contains a comprehensive list of hardware and devices that have been tested to work with this version of Windows.

Sound from my speakers is crackling or distorted.
Make sure your speakers are correctly connected to your computer.

Many computers have three or more jacks that connect to a sound card or sound processor, including a microphone jack, line-in jack, and line-out jack. Your speakers should be plugged in to the line-out jack. If you're not sure which jack this is, try plugging your speakers in to each of the jacks to see if any of them produce sound.


In some cases, you can work around the problem by disabling optional speaker effects that are known as enhancements. If disabling speaker effects solves the problem, you might need to update your audio driver.

If these steps don't fix the problem, check the information that came with your computer or speakers, or go to the manufacturer's website.

I have a sound card in my computer, but Windows doesn't recognize it.
For Windows to recognize your sound card or sound processor, you must find and install a compatible driver. Most sound cards and sound processors require driver software to work properly. Here are three ways to find and install a driver:

Use Windows Update. You might need to set Windows Update to automatically download and install recommended updates.

Install software from the device manufacturer. For example, if your device came with a disc, that disc might contain software that installs a driver for the device.

Download and install the driver yourself. You can search for a driver on the manufacturer's website. Try this if Windows Update can't find a driver for your device and the device didn't come with software that installs a driver.

For instructions on how to do each of these, see Update a driver for hardware that isn't working properly.

I found a new driver for my sound card, but I'm not sure how to install it.
Windows Update can search for updated drivers and install them automatically, but if you already have a new driver you want to install, you can do this yourself.

Most drivers today are self-installing—after you download them, you can usually just double-click the file to begin the installation. Software included with your hardware usually contains drivers that are installed automatically, but sometimes you might have to install a driver manually. Here's how:

Open Device Manager by clicking the Start button , clicking Control Panel, clicking System and Security, and then, under System, clicking Device Manager.‌ If you're prompted for an administrator password or confirmation, type the password or provide confirmation.

Double-click Sound, video and game controllers to expand that category, and then double-click the device name.

Click the Driver tab, and then click Update Driver.

I'm having trouble getting a portable music player, microphone, or other audio device to work with my computer.

You can connect a microphone, portable music player, or other audio device to your computer by using one of the jacks on the front, back, or side of your computer. These jacks directly connect to your computer's sound card or sound processor.

Most desktop computers have at least one line-in jack to connect a music player or other audio device and one line-out jack to connect speakers. These jacks typically appear on the back of a desktop computer. Many desktop computers also have a microphone jack, which is often on the front of the computer.

Most laptops don't have line-in or line-out jacks, but usually have microphone and headphone jacks located on the front or side of the laptop.

If you don't hear any sounds coming from an audio device you've plugged in to one of these jacks on your computer, check to make sure the jack isn't muted.
Microphone, line-in, and line-out jacks on a typical desktop computer

For more information, see Connect a microphone, music player, or other audio device to your computer.

I've tried all the solutions here and still can't get my sound to work properly.

Some sound problems can't be solved by the solutions listed above. For example, problems can occur with specific models of hardware, such as a certain sound card, music player, or headset. It might help to check the Microsoft Support website to see if it contains any information about your sound hardware.

If you're stuck, here are some webpages to start with:

USB speakers

Sound cards

Microphones

You can also check for support information on your hardware manufacturer's website. The manufacturer might have information about problems with your specific model of computer or sound card:

Dell support

HP support

Lenovo support

Creative support

Turtle Beach support
Laptop stopped connecting to wireless network

Problem description:
The laptop stopped connecting to the wireless network. The wireless connection used to work fine but now it’s not working. You tested your laptop with a few wireless routers without any luck.
Possible cause:

1. Wrong settings for the wireless card.
2. Bad or corrupted software.
3. Wireless card or router failure.

Possible troubleshooting steps and repair solution:

1. Make sure the laptop can see the wireless router. If the laptop doesn’t see the wireless router, make sure the wireless switch in your laptop is turned on.

2. Check network properties and make sure the wireless adapter is enabled.

3. Make sure the wireless router is turned on. Test your laptop with another wireless router if you can.

4. If the laptop can connect to the wireless router but cannot access the Internet, make sure that your wireless card settings match the wireless router settings. Make sure the security key in your laptop matches the securing key entered in the wireless router.

5. Access the device manager and try uninstalling the wireless adapter. Restart the laptop and let it redetect the adapter and reinstall the device driver.

6. Visit the manufacturer’s website and download the wireless card driver. Try reinstalling the driver.

7. Back up all personal data and try reinstalling the operating system from scratch.

8. If all software tricks do not work and all setting are correct, but you still cannot access the wireless network, try replacing the wireless card.

Laptop cannot detect wireless card

Problem description:
The laptop cannot detect the internal wireless card. The wireless card used to work fine but now it disappeared from the device manager. It looks like there is no wireless card installed even though the card is installed.
Possible cause:

1. Poor connection between the wireless card and slot.
2. Software problem.
3. Wireless card failure.
4. Wireless slot failure.

Possible troubleshooting steps and repair solution:

Here are some troubleshooting steps in case if your laptop stopped detecting the wireless card:

1. Try reconnecting the wireless card. It’s possible that connectors on the wireless card or inside the slot got oxidized and the card doesn’t make good contact with the slot anymore. Reconnecting the wireless card might fix the problem.

2. Try reinstalling the operating system from scratch. It could be software related problem.

3. If reconnecting the card and reinstalling the operating system doesn’t help, most likely you have a faulty wireless card. Try replacing it with a new one.

4. If replacing the wireless card doesn’t help, most likely it’s faulty slot on the motherboard. If that’s the case, you’ll have to replace the motherboard.

Alternatively, you can use an external PCMCIA wireless card instead of internal card. You plug this card into the available PC slot in your laptop, install the driver and use it same way you used the internal wireless card.

Wireless card disappeared from laptop

Problem description:
The wireless card disappeared from the laptop. The wireless card is missing from the network connections and device manager. It looks like there is no wireless card installed at all.
Possible cause:

1. Bad contact between wireless card and motherboard.
2. Corrupted software.
3. Bad wireless card.
4. Motherboard failure.


Possible troubleshooting steps and repair solution:
It’s possible that contacts on the wireless card got oxidized and the wireless card is not making good connection with the slot.
Remove the wireless card, clean contacts with pen erasure and install the wireless card back into the laptop. Test wireless card.

There is a chance that you have corrupted software. Not just the wireless driver, but some main core system files. Before replacing any hardware, try reinstalling the operating system from scratch.Test the wireless card again.

If reconnecting the wireless card and reinstalling the operating system didn’t help, most likely you have a faulty card. Try replacing the wireless card.

If you still experience the same problem even after replacing the card, most likely this is the motherboard failure. Replace the motherboard.

Here’s another suggestion. Instead of replacing the motherboard, you can try using a PCMCIA Wi-Fi card.

Laptop sees wireless router but will not connect


Problem description:

The laptop sees the wireless router but will not connect or get IP address. Another computer works fine with the same wireless router.

Possible cause:

1. Wireless card driver corrupted.
2. Problems with the operating system.

Possible troubleshooting steps and repair solution:

There could be a problem with the wireless card driver, maybe the driver is corrupted.
Go to the device manager, find the wireless card listed in the network adapter, right click on the wireless adapter and uninstall the driver. Now restart the laptop and let it detect the wireless card and reinstall the driver. Test wireless connection.
If it doesn’t help, try downloading the latest wireless driver from the manufacturer’s website and reinstall the driver. Test wireless connection.
If the connection still not working, back up all personal files and reinstall the operating system and device drivers from the recovery disc or installation CD. Test wireless connection.
If the wireless connection still not working, most likley the wireless card has failed. Replace the wireless card.

USB 3.0: Backwards Compatible in Theory, But Some Audio Drivers Aren’t Cooperating

One of the handful of USB 3.0 devices currently available: the new “SuperSpeed” port on a Verbatim hard drive.

“SuperSpeed USB” or USB 3.0 offers major forward advancement for hardware ins and outs, with faster throughput (yielding up to ten-fold speed gains over USB2), improved overall performance, and lower power consumption. That should be good news for music and motion users, who make heavy use of bandwidth for audio, storage, video, and other media applications. Real-world usage, though, has been scarce. The specification is nearly four years old, but extensive experimentation using USB 3.0 in the field has been limited largely to custom PC builders and those trying bleeding-edge machines.

All of that is about to change, and fast, now that Apple has drool-worthy new laptops with USB 3.0 ports. There aren’t dedicated USB 2.0 ports on Apple’s new MacBook Air and Pro lines, period. Theoretically, that shouldn’t cause a problem with those of you with earlier USB hardware. The specification calls for complete support for USB backwards compatibility. That means literally transmitting the same USB signals over the connector; all you need is a different cable. (The reverse is true, too: USB3 devices will connect to your computers that have USB2 ports, so as vendors switch to the new standard, you won’t have to buy a new computer or interface card.) This is all covered in the USB specification. Since that’s painful to read, here’s a summary from cable maker DataPro:


As part of the requirement, all USB 3.0 ports include the necessary pins and logic to process USB 2.0 signals, and all of the receptacles are physically compatible with their earlier counterparts.

The USB Implementers Forum has since the beginning described USB 3.0 as “offering backwards compatibility with billions of USB-enabled PCs and peripheral devices used by consumers.” If the specification is to be believed, this means devices that aren’t working aren’t fully compliant with existing USB specs. (Blame is not always so simple to establish, however, since the chipset on the computer side that supports USB 3.0 is involved, as well.)

With support for USB 3.0 on the new Apples and other hardware, though, comes new chip sets. The computer isn’t the only element in the equation; you need support from third-party hardware, too, in the form of their firmware and computer drivers.

And here’s the bad news. We’re already hearing from some users and readers that not all their gear is playing nicely with USB 3.0 ports. We’re awaiting more details from more vendors, but because some especially-enthusiastic Apple fans are going out and buying new MacBooks, it’s worth sharing some of this experience. With any new-generation computer hardware, it may be best to wait long enough to review any new compatibility issues before purchasing, if you’re looking to a machine that will go into mission-critical music service in live performance or a studio. In the long run, it’s fair to expect these issues will be ironed out, since we really are talking about USB2 signals sent over a USB3 bus.

Update: Another significant difference may be power. We’ve seen issues with USB devices before involving even minor power differences. One reader wisely points out that incompatibility reports we’re seeing all seem to involve bus-powered devices. And this is an area in which the USB specification alone doesn’t provide enough certainty to rule out potential problems. Different bus-powered USB devices have different power draws, and may respond differently to power availability. If you are testing an audio gadget, this is an easy one: find a correct power adapter for your device, and try plugging it in rather than relying on USB alone. If that fixes your issue, we definitely want to hear about it.

Here are some initial reports, as we gather more information.
Yes, USB2 and USB3 Are Compatible

MOTU tells CDM:
MOTU USB 2.0 audio and MIDI interfaces are indeed compatible with USB 3.0 on the latest Macs. We don’t recommend third-party USB 3.0 adapters, however, as results are less consistent there.

We’ve heard other success stories, too, apparently owing to drivers. Now, onto some of the troubles.
Your Mileage May Vary: USB2 Issues

PC vendor Rain Computers has already been shipping devices with USB 3.0, so I was eager to hear what their experience had been, especially because they’re one of a handful of PC vendors focusing on musicians and audio production. (Incidentally, to anyone griping about the new MacBook’s lack of upgradeability – with soldered RAM and only Apple to help you if you have so much as a battery problem – Rain is one definite alternative. The tradeoff is, Apple gives you thinness and low weight while taking away upgradeability to push the envelope.)

Kevin Jacoby explains:
1. At this point every Rain computer offers at least one USB 3.0 port. The new Element V2 offers five USB 3.0 which is the most of any Rain. We’re also going to release a new laptop which will be the first to have eSATA 3 (damn fast).

2. We’ve had some issues with USB 2.0 audio interfaces, DJ controllers, etc when plugged into USB 3.0 ports. Symptoms include stuttering, drop-outs, distortion, etc. That said, USB 2.0 has come an incredibly long way. As long as you have good drivers (like those from RME, Steinberg, etc) performance is great.

I think the entire audio industry is waiting to see what happens with USB 3.0, Thunderbolt and eSATA 3. It will be one of those VHS vs. Beta things, no doubt. One thing is pretty obvious: FireWire is officially dead.

Well, “dead” is a strong word if you’ve got working FireWire devices plugged into a computer, of course, but moving forward, I agree.

More troubles: reports an M-Audio Axiom works without incident, but has trouble with hardware as varied as a Korg KP3 and Novation Launchpad. (Worse: in comments, we’re hearing problems with the Axiom Pro.) These may or may not relate to what’s happening on the new Apple, depending on whether the Windows PC and Mac in this case share the same chipsets, and what the culprit actually is.

At this point, you may need to turn to your PC-using friends to find out how USB 3.0 is doing. Like the rest of us, audio vendors are only now getting their hands on the new Macs. Speaking of…
Hands-on with a Retina MacBook Pro

The reader story that touched off this discussion:

I thought this news would be of interest to your readers, and maybe give you a little schadenfreude as you’re always harping on waiting to update to the newest shiny until you’ve had confirmation from the audio vendors you rely on that their stuff works on the new platform .

So I bought one of the new Macbook Pro with Retina Display and besides one very annoying compatibility issue I am absolutely loving it. Compared to my pre-unibody Macbook Pro its replacing, this thing is blazing fast, and the screen really is as impressive as the tech press makes it out to be ( I have a 23″ LCD collecting dust because it looks worse than the 15″ screen on the laptop…never thought that would ever be the case).

Anyways, everything was gravy until I tried to setup my NI Audio 8 DJ audio interface, which connects via USB 2. Assuming that USB 3 was
fully backwards compatible with USB 2, I didn’t think there would be any issues. Besides, all my USB 2 class-compliant devices work fine
(external keyboard and mouse).

But after installing the latest driver from NI’s website, plugging in the Audio 8, and testing sound output from iTunes, I was greeted by nasty digital noise.

Looks like NI’s current drivers for their hardware are incompatible with USB 3 ports in Windows, and I’m guessing this issue crosses over
to the Mac as well. My guess is while the interface for class-compliant devices has been kept compatible, NI makes some low-level assumptions about the USB 2 protocol within its drivers that no longer holds up on a USB 3 port.

I’ve opened a support ticket with NI to see what’s up, but I’m sending this to you to warn any of your readers that are looking to pull the trigger on one of these to be aware that their existing USB 2 audio interfaces might be currently incompatible with the all USB 3 current line of MacBooks. If you’re dependent on your existing USB 2 audio interface working out of the box, better hold off until your vendor has confirmed their drivers to be compatible!

As we write this, we’re awaiting further word specifically from Native Instruments engineering on that case. But to be clear, this isn’t in the reports we have a problem exclusive to NI drivers. Some audio drivers are impacted; others are not.

It’s unclear whether this is simply an issue with new, untested chipsets for support with USB 3.0, or an issue with device drivers, or firmware, or a combination of the three. Issues like this can occur even without adding something new like USB 3.0 to the mix. Implementing the USB specification is a non-trivial matter.

Stay tuned as we learn more.
What About Thunderbolt?
Some are now speculating that the availability of USB3 – with high speeds and low power consumption – will mean Thunderbolt never picks off. However, our contacts at vendors making audio hardware argue otherwise. While it’s unclear what the situation will be on the PC side, the early near-standardization of Thunderbolt on Apple hardware means anyone making Thunderbolt audio gear can sell their wares to the big, impassioned, Mac-using audio community out there. (Thunderbolt is now on all but the apparently-defunct Mac Pro, the subject of an article for another time.)

Apogee, announcing plans to work with Thunderbolt in March, told CDM then through a spokesperson:


When designing an interface, Apogee has had to choose between performance (PCIe) and convenience (USB, Firewire). Thunderbolt offers an interface protocol that is better than both of those words – a transfer rate that’s higher than PCIe, a connection that’s more robust and simple than USB3, and more wattage than Firewire (for powering devices). Thunderbolt is quite simply the perfect no-compromise format for the Mac-based digital audio interface.

“Robust and simple” would be the key words there. It seems fair to assume we’ll see a mix of gear for these different formats; we’ll be watching and continuing to communicate with vendors to find out which buses they prefer. But in theory, the new Macs should support all of them – that is, once audio vendors work out some kinks with drivers.
More to Come

Consider this the first part of our coverage of USB 3.0. Whether you’re a Mac or Windows/Linux PC user, the availability of USB 3.0 on the popular Apple laptop line is sure to mean that manufacturers of audio gear are more likely to eye producing USB 3.0 devices as an option – and more likely to begin testing USB 3.0 with their existing USB product line.

If you have hands-on reports of your own, we’d love to hear them.

If you’re a manufacturer, do get in touch.

And we’ll continue sharing reports as they come in.
Updates: Official Reports

From M-Audio support:

M-Audio USB devices are not qualified for use on USB 3.0 ports at this time. If you are experiencing problems such as pops, clicks, crackles, dropouts, and distortion, or if your device is not recognized or drops offline, make sure your device is connected to a USB 2.0 (or USB 1.1) port.

All laptop USB ports failed at once

Problem description:
All laptop USB ports stopped working at once. Laptop stopped recognizing any USB device plugged into any USB port.
Possible cause:

1. Software problem.
2. USB controller failure.

Possible troubleshooting steps and repair solution:
1. Uninstall all USB related entries in the device manager. Restart the laptop and let it re-detect USB ports and install drivers. Test USB ports. If it doesn’t help, move to the next step.

2. Back up all personal files and reinstall Windows from scratch. It possible that all USB ports stopped working because some system files got corrupted.

3. If reinstalling Windows from scratch doesn’t help, most likely this is hardware related failure. Apparently, the motherboard has a failed USB controller. If that’s the case, the whole motherboard has to be replaced.

Alternatively, you can use an external PCMCIA USB card. You plug this card into the PC slot and get 2 or 4 USB ports instead.

Laptop's motherboard failure

A motherboard failure on a laptop that is out of warranty would usually mean that… it’s time for a new laptop. The price of a new motherboard is usually higher than the current value of the laptop.
Symptoms:

Plug in the power adaptor and try to start the laptop.
Nothing happens.
The “ON” light comes on, the fan spins, but nothing on the screen (black) and you can’t hear the HD working after 10-15 sec.
The “ON” light comes on, the fan spins, but after a few seconds the light goes off.
After pressing the “ON” button the screen stays black and you can hear a quiet high-pitched sound coming from the laptop.
Troubleshooting:

Look for the “lid closed” switch and try pushing it a few times. It’s usually a small switch near the hinges that is pressed when the lid(the screen) is closed. Sometimes these switches get stuck in the “lid closed” position that results in black screen(no backlight) or non-starting laptop. Also some laptops have a magnetic switch (newer Dell’s and most Apple’s), that doesn’t get stuck.

Test the laptop with another power adaptor. Although not common, the adaptor can fail and not supply the needed voltage even if it has a green “power on” light that lights up when you plug it in. Even if you measure the output voltage and it’s OK, the adaptor may have failed and wouldn’t supply that voltage under load (typically 3.5A to 6A). You can use an universal adaptor or go to an independent repair shop and ask them to check it (some shops will try to charge you for “estimate” for doing just that, so ask in advance).

Reset the RAM. See the article on RAM failures for instructions.

Remove the hard drive and the CD/DVD if it’s easily removable.

Finally try to start the laptop again with only the power adaptor plugged in and with the RAM reset and all removable components and the battery out. If there’s still nothing on the screen, you will need to bring it to a repair shop.

Laptop's Hard disk failures


Hard disk failures are the most common computer hardware problems. And laptop hard disks fail more often than desktop HDs. If you knock hard or drop your laptop even a few inches while it’s working, you may damage the HD.
Symptoms:
The laptop starts as usual but when Windows starts to load it goes to blue screen with either “UNMOUNTABLE_BOOT_VOLUME”, “hal.dll is missing or corrupt” or “WINDOWS\SYSTEM32\CONFIG\SYSTEM” (or similar) is missing or corrupt. All these error messages indicate a filesystem problem. Sometimes it can be fixed by just scanning the HD for errors. However in over 50% of the cases these errors indicate that the HD is starting to go bad and is probably developing bad sectors.
The laptop starts as usual but Windows freezes on the initial “Windows XP” screen, although the blue bar continues to move, and you can hear feint but continuous clicking. Hard disk have to be replaced.
As soon as the laptop is started there are loud clicks or grinding sounds and Windows doesn’t load. Hard disk have to be replaced.
Shortly after starting the laptop a message appears (usually on a black screen) “SMART test failed. Backup your data immediately and replace the hard disk” or similar. Well, that says it all. S.M.A.R.T. is a self-test that is build into the hard disk.

In almost all cases the laptop can be started from a “live” bootable CD and everything works normal. In rare cases the HDs PCB (printed circuit board) may short or even burn. Then the laptop wouldn’t start unless the HD is removed.
Troubleshooting:

The first case from above (corrupted filesystem) is by far the most common. There are several ways of diagnosing and fixing the corrupted/missing files. If this was just a software problem, the hard disk will continue to work properly. However keep in mind that this may also be a signs of deterioration and backup daily!

Also the hard disk will need some preventive maintenance. Check it for errors every few days or at least every week. To do that you must be logged in an admin account, then right-click the “C” drive in “My Computer”, select “Properties”, then “Tools”, then click on the “Check Now” button. Select both boxes and click on “Start”. Windows will tell you that the hard disk cannot be checked now but you can schedule a check for the next restart. Click “OK” and restart the laptop. The check will take from about 30-40 min. to over 2 hours, so do it when you’re not planning to use the laptop for some time.

Laptop Power Connector

A common weak spot on most laptops is the DC power jack. If someone trips on the wire while you have the power adaptor plugged into your laptop, chances are that the power jack will get damaged.

On most laptops the DC power jack is soldered directly to the motherboard and there are only three or four small pins holding it in place. Unfortunately that makes the power jack quite weak. Any sideways pulling of the DC power cord while attached to the laptop will usually dislodge at least one of these pins, breaking the solder around it. Modern laptops use quite a lot of power, from about 70W to 120W or even more. The bad electrical connection from the dislodged pin will cause sparks and heating that will eventually burn a hole through the motherboard and can even be a fire hazard. The usual signs of that are:

  • The battery is not charging properly or stays at half charge despite that you have been using the power adaptor.
  • The screen flickers (the brightness is changing) while the power cord is plugged in. This is caused by the laptop switching between DC power (screen is brighter) and battery power (screen is dimmer).
  • The DC plug gets hot after a few minutes of use and may even smell of burning.
  • There are “scratching” sounds coming from the DC jack.

All of these symptoms are caused by poor contact between the DC power jack and the motherboard.

There are several models of laptops that are resistant to this problem. All older Dell laptops that use the three pin DC power jack are usually not affected, probably because the power cord pops out easier. Also some older Sony Vaio models, and 1-2 Toshiba models where the DC jack is attached to the case away from the motherboard and all new Apple laptops, where the DC power cord is magnetically attached to prevent any damage to the laptop if someone trips on it.

To test for broken power jack:
  • Remove the battery
  • Plug in the power cord
  • Start the laptop
  • Gently wiggle the DC power plug on the back of the laptop

If your laptop shuts down abruptly (looses power), find a repair shop that can resolder or change the DC power jack as soon as possible, as the motherboard has already started to burn around the dislodged pins. Some repair shops will offer to replace the whole motherboard, however the price of a new motherboard together with the labour charge for installing it will usually be greater than the current value of your laptop and can go well over a thousand dollars.

Replacing or re-soldering the DC power jack is not an easy job too. It usually takes two to three hours depending on the damage and the model of the laptop. To reach the power jack, the laptop has to be completely disassembled and the motherboard taken out. Then if the board around the dislodged pin is badly burned, the power jack has to be un-soldered and the board has to be patched. After that a different power jack has to be installed, attached to the case of the laptop and connected with wires to the motherboard, as the patched board wouldn’t be strong enough to support the original type of power jack that was soldered directly to the board.

Differences in Wireless Technologies

Differences in Wireless TechnologiesYour family has recently decided to purchase a laptop. One of the things that is most exciting is that you will now have the ability to connect to the internet wirelessly! You go to your local computer store and are taken aback by the amount of Wireless technologies there seems to be. It is like a alphabet puzzle with Wireless B, Wireless G, and Wireless N technologies all available. Here is some background information on the different wireless family standards:

Wireless BWireless B, or 802.11b, is a technology that is no longer produced. It was one of the first technologies to utilize wireless networking and wifi access. Although it is very inexpensive compared to more sophisticated technologies, it is also the slowest (11/Mbs) and covers the least amount of range.

Wireless GWireless G, or 802.11g, is considered to be the market standard. It is a significant upgrade to Wireless B in both speed (54/Mbs) and signal strength. It allows for fast internet access, high download speeds, and long distance coverage throughout a home or office network. Wireless G routers and networks card are relatively cheap and can be found at most local computer stores. It is also backwards compatible with Wireless B technology, although it will not run at its capable speed.

Wireless NWireless N, or 802.11n, is considered to the future of wireless technology. It is capable of produced speeds of up to 4 or 5 times faster than the its predecessor Wireless G. Speeds may vary but is quite possible to achieve transmission speeds of 100/Mbs. Because Wireless N routers and wireless cards have enhanced antennas, the coverage is unparalleled.

Which One is Right for Me?When deciding which technology to equip your home network with you must consider a few things such as location and cost. If you have a relatively large home and only one router present, the Wireless N technology will certainly be the best fit. Of course, if you live in an apartment or a smaller home, the added signal coverage that Wireless N may offer may not be conducive to the price. All in all, it will come down to each individual consumer’s needs. As of right now, Wireless N technologies are appearing on store shelves across the country. All you have to do is determine if the added advantages warrant the added price.

Laptop hardware problem: No sound

Sound problems are one of the more common maladies to befall laptops. Typically a sign of a hardware issue, these situations can sometimes result in cases where the laptop's speakers stop working altogether.

While a laptop repair expert may need to handle major sound troubles, there are a few things users can check at home to diagnose the problem.

Check #1: Volume controls
Users should first verify that they haven't simply turned off the volume somewhere. Many laptops have their own, external volume controls on the top or on the side of the keyboard. The same is true for external speakers that may be connected to the laptop. Windows also has its own volume control in the bottom right hand corner of the screen, while individual programs, such as music players, have options to adjust the volume as well. Users should first run through each of these controls to see if any are simply turned down.

Check #2: Hardware and drivers
If the troubles still exist, users can check their laptop's hardware devices for problems. Laptops use processors to play sounds, while regular desktops have sound cards. Both can be checked in the same menu.

1. Click "Start" and open "Control Panel."
2. Select "System" or "System and Maintenance"
3. Open "Device Manager."
4. Double-click "Sound, video and game controllers."

Clicking any one of the available audio codecs opens a dialog box that describes the processes' status and properties. If any one of the devices is damaged, users can click the "Troubleshooting" button to find solutions.

In the same location, users will be able to check the status of their drivers. Sometimes, a computer will stop playing sound after it has been upgraded from one Windows operating system to another. Its old drivers may no longer be compatible with the newer version of Windows. As a result, users may simply need to download updated drivers to regain their sound.

Troubleshooting Laptop Hardware Problems

Laptops and notebook computers often require much more attention when the user decides to troubleshoot specific hardware problems. Because of this, very few people actually manage to get to the stage of disassembling the laptop to search for potential sources of hardware failures. This two-part guide covers some of the most common issues that your laptop might suffer from along with tips on how to diagnose and fix them.

Due to the nature of this article series, please don't ignore the following disclaimer:

This guide should be used just for educational purposes and does not replace professional assistance, technical consultation, or expert service by any means. You really should not try out the techniques described here unless you feel totally comfortable working on your laptop and you understand the possible consequences of your actions. Experience in the field helps a lot!

On the other hand, if your laptop is past its warranty period and you cannot afford (either financially or the required time it takes, herein including a standard RMA process) to take the notebook to a qualified expert or repair shop, and you have a little bit of experience working with desktop computers and electronics, then you may want to try troubleshooting and "doing it yourself."

Laptop computers are sometimes more "sensitive" compared to desktops and chances are that you may not succeed at first. It depends on the hardware problem. It can either be piece of cake or weird as hell, and then luck of draw applies; or you may not even diagnose or locate the root of the problem. It's still worth a try though, right?

Throughout this series, our main focus will be on the technical hardware side. Therefore, we won't recite the overused software clichés of getting rid of malware and spyware, doing an antivirus check, defragmenting, and so forth. Rather, we are going to see what you should do when your laptop doesn't power on, beeps like there's no tomorrow, runs without displaying anything on the screen, overheats due to inadequate cooling, etc.

Once we locate a problem, we will describe a potential fix. However, sometimes the troubleshooting routine must be re-started if more problems occur. Other times, unfortunately, we might find out that the LCD screen or the circuitry that powers the LCD is faulty, and then there's little to nothing we can do ourselves. It's likely that replacing the screen will cost more than a new laptop.

The first part of this series targets the main hardware failures -- basically, what to do and how to troubleshoot if your hardware issues are so critical and advanced that they prevent your laptop from working appropriately (i.e. doesn't power on, no display output, etc.).

In the second segment, we're going to cover techniques to diagnose and fix system instabilities, such as a faulty memory causing BSODs, an overheating notebook, touchpad, or accu-point. These are the kinds of problems that do not prevent a laptop from booting, but do cause countless headaches because they are frustrating.

If you feel totally prepared to begin, then let's move on.

How to fix laptop motherboard with failed NVIDIA graphics chip

In this post I explain how you can fix a laptop motherboard with failed NVIDIA graphics chip. This repair might apply to some HP/Compaq laptops and probably some other laptop brands. If this repair works for your laptop, please mention the brand and model number in comments after the post. This will help other readers with similar laptops.

This method should work for the following models: HP Pavilion dv2000, Pavilion dv6000, Pavilion dv9000, Compaq Presario v3000, Presario v6000, HP Pavilion tx1000, Pavilion tx2000.

By the way, I just fixed my son’s Xbox 360 with red ring of death (error 74) using exactly same technique.


MOST COMMON PROBLEM SYMPTOMS
1. Laptop turns on with garbled video on the internal laptop screen and external monitor.
2. Laptop turns on as normal but there is no video on the internal laptop screen or external monitor.


MY UNDERSTANDING OF THE PROBLEM
The NVIDIA graphics chip soldered to the motherboard. When the laptop gets very hot, the NVIDIA chip separates from the motherboard and laptop video fails.


HOW TO FIX FAILED NVIDIA CHIP
I have previous posts explaining how I fixed same problem by baking the motherboard in an oven or bubble-wrapping the laptop. But today I’m going to fix the motherboard using a heat gun. Basically, I’m going to heat up the NVIDIA chip with a heat gun to solder it back to the motherboard (reflow). I think this method is more reliable and the repair should last for a while.

WARNING!
There is no guaranty this method works all the time. While doing this repair you may damage the motherboard and make it unrepairable. Also, you may damage the laptop while taking it apart.
Proceed at your own risk and don’t blame me if you turned your laptop into a very expensive door stop.
If you don’t feel comfortable doing this repair, take your laptop to the repair shop.


HOW I FIXED THE MOTHERBOARD
First of all, you’ll have to disassemble the laptop and remove the motherboard. You can find laptop disassembly procedure in the service manual. If you having trouble finding the manual, leave a comment and maybe I can point you to the right direction.

In my example I’m using a motherboard removed from HP Pavilion tx2000 laptop.

In most laptops the graphics chip located under the CPU heatsink (and it has NVIDIA logo on it), so there shouldn’t be a problem locating the chip. The chip has a glossy top surface.

For this repair I’m going to use an Ecoheat heat gun EC-100.

In order to figure out how to position the heat gun and for how long, I tested it on a penny with a small piece of solder on the top.

The Ecoheat heat gun has a switch on the handle. There are two positions for the switch. Position 1 – slow. Position 2 – fast.
I used position 1 – slow.
I positioned the heat gun about 1 inch away from the penny and turned it on.


After about 40-45 second the solder started melting. After 50 seconds the solder melted completely.


To protect the motherboard from the heat I used a regular cooking aluminum foil. I cut off a piece of aluminum foil and folded it a few times to make my protection shield thicker. After that I cut off a square opening right in the middle, same size as the NVIDIA chip.

After I removed the heat sink, I had some old thermal grease stuck on the NVIDIA graphics chip. You can remove old thermal grease using alcohol swabs. It’s not necessary to make it perfectly clean. Just make sure there are no large chunks of thermal grease on the chip.

UPDATE: Some people mentioned that I should have applied some liquid flux underneath the NVIDIA chip for better results. I didn’t do it this time. I’ll definitely do it next time if the motherboard fails again. I found this video explaining how to apply liquid flux under the GPU chip. This video was made for Xbox 360 motherboard but should apply to any laptop motherboard too.

Finally, I positioned the heat gun above the NVIDIA chip about 1 inch away and turned the heat gun into the position 1.


After 50 seconds I turned it off and let the motherboard cool down for about 20 minutes.

Don’t forget to apply new thermal grease on the NVIDIA chip when you install the heat sink.
Some laptops use thermal pads instead of grease. If that’s the case with your laptop, make sure the thermal pad positioned correctly.

After I assembled the laptop back together, the video started properly!
The NVIDIA graphics chip problem fixed!
Will it last for a long time? I don’t know. Still testing.

Most common laptop hardware problems

In this post I will summarize most common laptop hardware related problems ever mentioned on this site.

I will not be digging into the operating system related problems, only laptop hardware issues.

I’ll provide most common laptop failure descriptions and give some suggestions how to troubleshoot or repair the problem.

Problem 1.
Laptop doesn’t turn on at all.


Problem description: When you plug the AC adapter into the laptop, there are no lights turning on at all. When you push on the power button, nothing happens. The laptop appears to be completely dead, makes no sounds, no indications of life.

Possible problem:
- AC adapter failed and the battery discharged completely. First of all, test the AC adapter. If it’s dead, replace the adapter.
- DC jack separated from the motherboard (or DC jack broken) and the laptop doesn’t get any power from the AC adapter. In this case the DC jack has to be replaced.
- Laptop motherboard failed. If that’s the case, most likely the laptop not worth fixing.

Problem 2.
Laptop turns on but screen is blank.


Problem description: The laptop turns on, LED lights on the laptop turn on, cooling fan works but nothing appears on the screen. The screen is completely black and blank. There is no image on the screen at all, not even a very dim image.

Possible problem:
- This problem could be related to the memory failure. It’s possible one of the memory modules failed and the laptop doesn’t turn on because of that. In this case you can try reseating memory modules to make sure they are making good contact with the slot. You can try removing memory modules one by one and test the laptop with only one memory module installed. You can try replacing memory modules with new modules.
- If reseating/replacing memory modules doesn’t help, try removing the hard drive, DVD drive, modem, wireless card, keyboard, etc… In other words, disassemble the laptop to bare minimum and test again. If the laptop still doesn’t turn on, most likely you have failed motherboard or processor.

Problem 3.
Laptop turns on and off repeatedly.


Problem description:
The laptop turn on without showing any image on the screen. After a few seconds the laptop turns off by itself. Then it turns on and off again. It continue turning on and off repeatedly until you power off the laptop completely.

Possible problem:
Most likely it happens because of some kind of motherboard failure. You can try reseating/replacing memory as I described in the Problem 2. If it doesn’t help, I would say this is motherboard related failure.
In most cases it’s not worth replacing the motherboard, better to buy a new laptop.


Problem 4.
Laptop makes noise while running.

Problem description:
The laptop turns on and everything works fine, except it makes some constant weird grinding or rattling noises. Some laptops make noises all the time, other laptops have them intermittently.

Possible problem:
In most cases this noise is coming from the cooling fan or laptop hard drive. You can turn on the laptop, wait until it starts making noise and after that listen closely on the bottom of the laptop. If the laptop starts making noise when the cooling fan starts running, most likely you have a failing fan. Replace the cooling fan.

If the laptop makes noise even when the fan not spinning, probably it’s coming from the hard drive. Back up all personal data from the hard drive as soon as possible, it can fail any moment. Replace the hard drive.

Here’s another technique to figure out if the noise coming from the fan or hard drive. Remove the hard drive from the laptop and stat the laptop. Wait until it warms up and the fan starts spinning. If the laptop still makes same noise even when the hard drive removed, most likely it’s bad fan.

Problem 5.
Laptop shuts down or freezes while in use.


Problem description:
The laptop turns on and runs properly but after a while it freezes or shuts down without any warning. When it happens, the laptop feels hot on the bottom. Also, the cooling fan works harder than usual.

Possible problem:
Most likely this is heat related issue. It happens because the cooling module gets clogged with dust and the laptop cannot “breath” properly. The laptop shuts down or freezes because the processor (CPU) overheats. Cleaning the cooling fan and heatsink should fix the problem.

Problem 6.
Laptop battery not charging properly.

Problem description:
The laptop battery stopped charging properly. It’s not charging at all or charges only after you adjust the position of AC adapter plug inside the power connector on the laptop.

Possible problem:
- Failed battery. If the battery stopped charging completely try reconnecting the battery first. If it doesn’t help, remove the battery and try running the laptop just from AC adapter. If the laptop runs fine from AC adapter but doesn’t charge the battery at all, most likely it’s either bad battery or motherboard problem. Try replacing the battery first.
- Loose DC power connector. If the battery charges only after you adjust the position of AC adapter tip inside the connector, this is DC jack related problem.

Problem 7.
Screen light doesn’t work or fails while the laptop running.


Problem description:
The laptop starts properly but after a while the screen light turns off. The image still appears on the screen but it’s very dark. In some cases the screen light never starts but you still can see a very faint image on the screen. In all cases the laptop video appears to be fine on the external monitor or TV.

Possible problem:
Most likely it’s either the screen inverter or screen backlight lamp (CCFL) failure. Both fail very similarly causing the screen light to go off. In order to trobuleshoot this kind of failure effectively, you’ll need some spare parts: either new working inverter or known good backlight lamp.

Problem 8.
Laptop has strange or garbled image on the screen.


Problem description:
The laptop turns on properly but shows bad, wrong or garbled image on the screen.

Possible problem:
- Graphics card failure. First of all, test your laptop with image output on the external monitor. If you see the same problem on the external screen, most likely this is graphics card related failure.
- If the problem appears only on the laptop screen, it could be related to one of the following: poor connection between the video cable and motherboard or LCD screen or failed video cable or failed LCD screen.

This article shows some examples of failed laptop video and explains how to narrow down the problem.

Problem 9.
Some laptop keyboard keys stopped working.

Problem description:
The laptop turns on and runs properly but some keyboard keys do not work at all or type wrong characters.

Possible problem:
Most likely this the keyboard failed. Laptop keyboards are not repairable. If some keys stopped working, you’ll have to replace the keyboard.

Problem 10.
Missing or broken keys on laptop keyboard.


Problem description:
A key got separated from the laptop keyboard.

Problem solution:
If a key got separated from the keyboard, it’s still possible to fix it without replacing the entire keyboard.
Hopefully you didn’t damage the key hinges.
If you have many keys missing, probably it makes sense to replace the whole keyboard.

Problem 11.
Laptop makes repetitive beep sound on startup.


Problem description:
You turn on the laptop but there is no video on the screen. Instead, the laptop makes repetitive beeping sound. You can “fix” the problem if you press on the keyboard keys.

Problem solution:
Most likely it happens because there is a stuck key on the keyboard. In this case you’ll have to replace the keyboard.

Problem 12.
Liquid spilled on laptop.


Problem description:
You spilled something on the laptop and it’s stopped working.

Problem solution:
Liquid spills are very dangerous and unpredictable. If it happened, turn off the laptop ASAP, remove the battery and do not use it until all internal parts are inspected for liquid damage.
It’s sill possible the laptop will work again after you clean the damage.

Laptop Running Hot? - Reasons and Solutions to Heating Problems

Laptop heating is perhaps the most predominant problem that all of us may have encountered or will encounter with Laptop technology. The sad thing is, there is no way you can stop Laptops running hot. But you can take some steps to abate the heat they generate with these tips.

Why Do Laptops Heat Up?
Before we give you the different ways by which you can lessen the heat emitted by your laptop, we will discuss the reason for this. Why do laptops really heat up ? There are several known reasons why this occurs, although there is no really clear cut study about this. The common reasons why laptops heat up include:

Clogged laptop vents - If your laptop is old, chances are it might have accumulated a lot of dust and/or lint that clog your laptops air vents. Heat emitted by the laptop parts inside can not escape out of your laptop's body. Hence, while using your laptop for any length of time, you'll soon feel the heat coming out from your laptop.

Room Temperature - If your laptop's vent is clear of any obstruction, but you still feel your laptop heating up, the problem may be caused by the temperature of the room where you are working. Hot room temperature contributes to the heating up of your laptop.

Improper Placement of Laptop - Related to the first reason we mentioned, another cause of too much heat emitted by your laptop might be the fact that you placed your laptop on a surface which may be stopping the airflow through your laptop's air vent.

Malfunctioning laptop internal fan - Our laptops are similar to a car's engine. If the cooling fan is not properly working, your car would experience overheating. The same is true with our laptops. A malfunctioning fan will cause the laptop to heat up, since nothing is cooling it down.

Over performing laptops - Another reason that might be causing your laptop to heat up is the fact that it is overpowered.

How to Lessen the Heat Emitted by Laptops
Now that you know some of the most common reasons why laptops heat up, what can you do to abate this heat? Take note, we said abate and not prevent or stop. That's because laptops are bound to heat up no matter how much manufacturers claim that their laptops don't. Somehow, the laptop's thin and small body makes it inevitable. The cramped space and electronics inside your laptop make it prone to heating up.

Here are some of the most common ways by which you could lessen the heat generated by your laptop:

Clean laptop vents - Make it a habit to regularly check your laptop's vent. This is the key reason why laptops heat up so it must be checked first. If you find your laptop's air vent clogged, use some portable pressurized air to blow out the dust and lint clogging it.

Work in a Cooler Room - As much as possible, work in a room where the temperature is cooler. It doesn't have to be in an air-conditioned room, but a room with good air circulation is enough to lessen the heat your laptop generates.

Check Your Laptop's Internal Fan - If you're not brave enough to open up your laptop to check its innards on your own, get a computer technician to do this for you.

Adjust Power Settings - Your laptop maybe emitting too much heat due to over-usage. But we're not going to say that you should stop using your laptop. Actually, you may use it all you want, but it would be wise to adjust the laptop's power settings to a level that won't overpower your laptop's capabilities. Laptops today have the option for various usage settings. Study the best settings for your laptop, specifically those that could lessen the heat generated by your laptop.

Laptop Cooling Pad - I don't know about you, but in the area where I am right now, generic laptop cooling pads are widely available at PC stores. And these cooling pads don't cost too much. You can get some cooling pads for $3. Since I bought my laptop cooling pad, I never use my laptop without putting it on top of the cooling pad.