Typing with All Ten Fingers

Getting Started

Almost all computer users already know to type. Most start by a hide-and-seek keyboard game with two fingers and gradually use more fingers to get faster. Many stay with that, loosing time they could save by typing the right way.

To learn typing with ten fingers will take you something between two days and two weeks, and the best thing is: you don't have to torment yourself by typing sentences that only consist of ASDF and JKL or something equally annoying.

Just place the fingers in the proper position, and start typing anything. (Write an email, do your annual tax declaration, etc.) If you squeeze yourself to always return your fingers to the proper position, you are on the right way. Look at the keys while you are typing. Typing without looking will later be achieved with ease.

The Proper Position
Whenever you type, place your forefingers on F and J. These keys are marked by little bars or small dents on most keyboards (red dots in figure below). The other fingers go on the keys on the left resp. right. After some time, your fingers will seek this position themselves. The thumb (choose one) is responsible for operating the space bar. (The other one does nothing, so it's actually only "typing with nine fingers", but we don't care.)


Figure: Sun Type 5 layout, screenshot from xkeycaps
Greyscale version for better printing results

The colors in the picture indicate which key should be pressed by which finger. The little fingers are very important, they press the shift, return, and backspace keys. The shift keys are used crosswise: for 'left' keys, use the right shift key, and vice versa. At the beginning, you will propably find the lower left part of the keyboard (ZXCV) somewhat inconvenient, but you will get used to it. The keys B and Y lie almost exactly in the middle, but it is advisible to press them with the left resp. right finger as shown in the figure.
Getting Faster

At the beginning you will propably type slower than you used to, but you will notice that you get comfortable with the keyboard pretty fast. It took me about two days of modest effort to reach an acceptable typing speed, and about two weeks to be as fast as I were with the six-scrambled-finger 'system' I used before. Remember: After typing a key, always return the finger to its base position.
Typing Blindly

Perhaps the bigest advantage of learning proper typing is that looking at the screen while typing enables you to correct typos immediately, without having to use the cursor keys to return to errors you did not see earlier. If you get the wrong key, use the backspace key, even if you've typed some right letters afterwards. Erasing a misspelled word and retyping it is faster than moving the cursor, correcting the word, and going back to the end of the line.

If you have gained practice in ten-finger typing (let's say after some days), you can start trying not to look at the keyboard to find the keys. It will at first seem impossible, but try it.

Do not try never to look at the keyboard. Hitting the right keys with the wrong finger (or hitting the wrong key!) is much worse than "peeking". It took me about two weeks to do some (slow) blind typing, but even today, I occasionally look at the keyboard when typing passwords (they are not printed on the screen). At the beginning, do not worry about digits and symbols in the top row of the keyboard (and function keys, and combinations like Alt-F4, etc.). These seldom occur in the middle of a word, so it is not a disadvantage not to find the 5 or & keys bindly rightaway. Look at the keyboard to see where they are, and be happy with that.
Is It Worth the Effort?Definitely yes. You will type faster and with less errors. And it will take you at most a month to learn it, with only modest extra effort over your daily typing.
DiscussionSome people suggest to learn typing blindly rightaway. The advantage of this approach is that you learn the proper method from the beginning. I do acknowledge that fact, but that additional obstacle will probably scare away some people that try to learn ten finger typing. I suggest to first get the fingers right and then try blind typing. Those who type blindly in their homegrown system might consider the other method.
The Right KeyboardKeyboards differ in two ways: key layout and mechanics. The layout is what is printed on the key caps. Most western countries use some variant of the QWERTY layout (e.g., Germany QWERTZ, France AZERTY). Use any you like, and stick with it. I personally prefer QWERTY, as programming needs lots of {[]}, but there are no umlauts (äöü) (there are ways around this). The Dvorak layout is a completely different layout aiming to ease typing.

Keyboard mechanics come with/without key click, keys using springs, plastic foil keyboards, etc. Sometimes, changing the keyboard makes you more comfortable, so try some other keyboards.

It is a great relief to use a hand cushion. I made one myself using a 3cm thick piece of foam rubber and covered it with linen. The heel of hands rest on the cushion and no latent force is needed for lifting shoulders and arms.
FeedbackI like to get feedback to this page. If you find these hints useful (or misleading), drop me an email. Some earlier feedback I got is collected here.
SoftwareAs said above, one can learn typing without using typing tutors. Anyway, here are some links:
Google Typing Tutors Directory
Online Typing Courses Directory
Typespeed: Test your typing! (Linux)

What to Do About a Wet Laptop

Laptops can be drenched in a moment.

According to studies by laptop insurance provider Protecsure, spilled liquid ranks among the top four causes of damage to portable computers. From that agonizing, slow-motion moment when the spill happens until the instant the liquid lands on your computer, you have just seconds to remove the battery and unplug the power adapter. The faster you do this, the better chance you have of avoiding a short circuit and saving your computer.

Air Dry
If you just spilled a few drops of clean water on your laptop, the simplest method is to let it dry naturally. Turn the laptop upside down, leaving it open so that air can flow around the keyboard; you can even set it in front of a fan. Don’t use heat, though, because hot air can melt plastic components inside the machine. After letting it dry for two days, you can check for moisture around the area where the spill occurred. If it feels dry, reinstall the battery and boot up the machine.
Desiccant

If the liquid soaked deep into the innards of your laptop, you can draw it out using a desiccant, such as the silica gel that often ships with new products to keep them dry, or some uncooked rice. You also need a container large enough to hold your laptop -- a plastic storage tub with a lid or a garbage bag and tape -- to create an airtight seal that prevents external moisture from saturating the desiccant before it can draw the water out. After filling the container with enough rice to submerge your laptop completely, close it and keep the computer inside for two days. Brush off any rice with a soft cloth before powering on the laptop.

Remove the Keyboard
Laptop keyboards are the most vulnerable spot for spills, and you may need to remove the keyboard to reach all of the liquid. Start by pouring off the liquid and wiping up anything that spilled on the computer's surface. After removing the keyboard according to the instructions found in the support section of the laptop manufacturer’s website, you should wipe up any remaining liquid and use a mild cleaner, sprayed onto a soft cloth, to finish the job.

Alcohol
If your computer was completely submerged in a liquid other than water, surface-cleaning techniques probably won't be enough to get inside all the nooks and crannies. Use 99 percent pure rubbing or isopropyl alcohol to displace the offending liquid -- anything that's less pure may leave residue when it evaporates, which could cause a short. In a large container, submerge your laptop in rubbing alcohol for several minutes, and swish it around so the alcohol gets into all the components inside. After removing the computer from the alcohol solution, let it dry for two days.

Disassemble the Computer
If all else fails, and you have confidence in your technical abilities, you can take apart your laptop and clean it. There’s a risk of further damage, however, so proceed with caution and follow the instructions on the laptop manufacturer’s website. After you've dissembled the computer, clean up any liquid residue with a cotton swab dipped in 99 percent isopropyl alcohol. The computer should dry for 48 hours before you reassemble it and turn it on
.

Selecting Speakers for Your Laptop

"Nearly every PC includes some sort of default speakers, but they're invariably not very good," an October 2011 CNET article observes. The same goes for laptops, whose built-in speakers usually lack power unless designed specifically for multimedia use. Among three main types of external laptop speaker systems -- mobile, desktop and high-end audiophile quality -- the best kind for you depends upon your needs.

Mobile Speakers
Often sold as a clip-on bar, mobile speakers for laptops are convenient to bring with you and easy to connect. Typically offering less than 5 watts per speaker, their small size can mean less responsive sound, but performance varies between models and manufacturers often don't provide exact specs. Plug in the USB cable and you're good to go, with power and sound connected at once. Some may also have auxiliary inputs to connect to mobile devices such as an iPod or smartphone.

The Logitech Z305 is one example of this kind of speaker, with 360-degree sound and healthy bass. Using USB, it requires neither batteries nor a bulky adapter, and it can clip onto your laptop or sit on a desk. If space is at a premium, you may want something like the compact, USB-powered Altec Lansing ORBIT. Its circular design fits where many other speakers cannot, and a built-in stand helps project the sound toward the audience. It only has mono sound but good clarity and power, although bass is a bit lacking.
Powered Desktop Speakers

Powered desktop speaker systems aren't particularly portable, but they aren't hard to set up, either. Often containing two desk units and a separate subwoofer, powered speakers are the workhorse of the laptop audio world. You need to plug them into the wall, but they contain built-in amplifiers and draw higher power accordingly, from 20 to 200 watts total.

The Cyber Acoustics CA 3602 comes in a standard two-speaker, one-subwoofer configuration. Each side channel gets 6 watts and the bass consumes up to 18 watts for 30 watts of total power. Adjustable volume and bass make for comfortable listening, with a 3.5 millimeter line-in and headset-out jacks. Sound reproduction is good and can easily fill a mid-sized room.

With 200 watts of THX-certified sound, the Logitech Z623 packs plenty of sound into an affordable product. Two RCA inputs and two mini line-in jacks make it simple to connect to any kind of sound output. A headphone jack is included for more private listening, and you'll find controls for bass and volume on one of the speakers.

High-End Systems
A full speaker system includes magnetic shielding, variable crossovers and other features targeted at the audiophile market. Some sets include their own amplifiers, while others require a receiver connection, but all have superior sound quality.

Not quite as costly as a full speaker system, the Bose Companion 5 promises stellar quality in a desktop package. These speakers support USB and a mini-jack for connecting to your laptop. Along with volume and bass controls, this unit also includes a mute button on its wired remote, which may be easier to get to than the subwoofer. It also has a six-channel sound decoder inside for higher fidelity playback on movies and games.

Not for beginners, the Polk Audio RM6750 is a solid 5.1-channel system with magnetically shielded satellite speakers -- common to surround-sound systems -- for use next to electronics. It includes powerful controls such as low pass filter depth and phase selector, and the subwoofer cranks out 100 watts. Extra satellites will turn this set into a 6.1, 7.1 or even 8.1 system. These speakers need a separate amplifier to ensure the best sound experience, and connect with bare wires.

Making a Decision
Once you know the kind of speaker you want, it's time to factor in your budget. As of March 2012, mobile speakers cost about $20 to $60, while powered desktop speakers fall between $60 and $150. High-end speakers start around $150 and go to upwards of $400.

A final concern is size. As with laptops themselves, there's a tradeoff between speaker performance and portability. "Bigger and heavier speakers almost always sound better than small, lightweight ones," says Steve Guttenberg of CNET, but high-end systems aren't designed for toting around with your laptop. Some music lovers decide on mobile speakers for on-the-run listening and keep a larger, better-quality set at home
.

Buying a Laptop on a Budget

Look for laptop savings locally and on the Web.
Buying a laptop on a budget takes some planning. Before you start looking, scope out a realistic budget range, starting with the worst-case bottom price and ending with your realistic can't-exceed ceiling. Jot down a list of the software you'll need to run, and check each application's requirements as you compile a feature set that represents your rock-bottom performance needs.

Limit Your Options
Take a hard look at exactly what you'll use this laptop for, and match your needs to the bottom end of your specifications. For example, choose a smaller screen if you won't need to open wide spreadsheets or view panoramic images, or opt for a slower processor if you'll only use word-processing software. Plan your purchase to minimize the extras you'll need to buy -- extra RAM, for example -- and figure any necessary add-ons into your budget. Inexpensive netbooks make good sidekicks for full-sized computers, although they typically lack the optical drives you'll need for software installation from CDs and DVDs, and don't offer the performance of an entry-level notebook.

Buy RefurbishedMany computer manufacturers offer refurbished devices at sizable discounts. These typically represent consumer returns that undergo thorough testing, with replacement parts installed where any defects show up. You'll receive a manufacturer's warranty with these units, although the warranty term may differ from the coverage offered on new systems. Some refurbished units are current models, whereas others lag at least one hardware generation behind. Don't expect a broad selection.

Choose Store Demos
You can sometimes score a good deal on a floor demo when you visit a local retailer and look for display units placed on sale when new models come out. Check these units carefully for signs that they've been pounded on by kids and careless adults, and ask for verification of warranty coverage in writing. If you can't make sure everything works while you're still in the store, either walk away and find a better deal, or clarify your return privileges before you buy.

Student/Teacher Discounts
Whether you're in college or teaching school, your current ID card can entitle you to educational discounts on computer hardware and special-edition software. Many computer manufacturers offer direct discounts when you furnish them with a copy of your school ID. Some schools sell systems in their bookstores and offer the discount at the checkout counter. School staff members also qualify for price breaks, as do parents of students. A California-based not-for-profit, Student Discount Laptops, offers new and refurbished computers for high school and college students across the United States.

Military Discounts
Active-duty military personnel and reservists with on-base access can qualify for special pricing at their Post Exchange, or PX. Don't expect the range of options you'd find in a warehouse-style retail store or on an Internet merchant site. You'll be limited to the models in stock, but you'll be able to buy at a discount without waiting for delivery. You can also obtain military discounts directly from computer manufacturers
.

How to Use an HP Laptop Webcam

Use an HP Laptop Webcam
Webcams are an increasingly popular accessory for Hewlett-Packard Laptops and using them can increase your ability to communicate. Learning a little more about how to use your HP laptop webcam can make your laptop indespensible for meetings, video emails, and even gaming.

Instructions
1
Install your webcam. If you have a built-in webcam (such as on the HP Pavilion Dv5z, or HP G70t series) then skip to Step 2. Place the CD that comes with the Webcam into the disk drive. Follow the on-screen prompts and plug in your webcam only when you are told to by your program; doing otherwise may cause problems that are difficult to correct. With your webcam installed, proceed to Step 2.

2
Use MuVee Autoproducer 5. With your HP webcam on your laptop, you can use the MuVee program to record images and sound to playback later. Select "Start," then "All Programs," followed by "MuVee Autoproducer 5.0." Once the program is running, select "Tools," then "Get Video from Camera" to see the image the camera sees. You can then adjust the video using the "Device Settings" icon (it looks like a wrench with a camcorder).

Download POP3 or IMAP mailboxes (including SSL) to Exchange Server

3
Use Windows Movie Maker. Once you've recorded the images using MuVee, and saved them under the WMV file designation, you can use Windows Movie Maker to edit the images. You can not use Windows Movie Maker to record images, as you will receive an error message when attempting to use your webcam and this program together.

Click "Start," then "All Programs," followed by "Windows Movie Maker" to begin the program. To find the file you saved under MuVee's program, select "File," and then "Open" to find the video you created in MuVee.

4
Use Windows Live Messenger. You can use your webcam to talk to your friends, family, and colleagues with your Webcam and Windows Live Messenger. If it is your first time using Windows Live Messenger, you will need to download the free program. Select "Start," then "Windows Live Messenger Download." When the pop-up appears, select "Get it Free."

After the program is finished installing and is running, select ""Tools." Next, select, "Audio and Video Setup" and then "Next" to follow the on-screen prompts.

To start a session, select "Actions," then "Video," followed by the "Start a Video Call" to begin Windows Live Messenger
.

How to Set Up Microsoft Outlook Email on a Laptop

How to Set Up Microsoft Outlook Email on a Laptop
Email is a mandatory part of today's world, and having an email account on your laptop is almost never an option. Microsoft's Outlook software, which is part of the Microsoft Office suite, is the most well known software client package today. Available in the free "light" version of Outlook Express, a Macintosh version called Entourage and the standard Outlook, it's an easy-to-configure package, which requires only a few settings to work perfectly.

Instructions
1

Launch Outlook and select "E-Mail Accounts" under the Tools menu.

2

Choose "Add new e-mail account" when the wizard opens.
Save money on telcom costs with your own FaxFacts Fax Server

3

Select the type of server your provider uses. For most DSL and cable ISPs, you will check off POP3. If you're connecting to your email at work, check with your IT department to see if you're working with an IMAP or POP server, or a Microsoft Exchange Server.

4

Enter the following information in the POP3 settings window (you may have to call your ISP for some of these settings):
Your Name: This is the name that will appear in the recipient's inbox when they receive an email from you.
E-Mail Address: This is your full email address.
User Name: This your is logon name, which is usually your email address, or the first part of your email address (before the @ sign).
Password: Your password.
Incoming mail server (POP3): This is the name of the server that allows you to receive email.
Outgoing mail server (SMTP): This is the name of the server that allows you to send email.

5

Find out if there are any additional settings you have to configure. For consumer email providers (DSL and cable), the default settings under "More Settings" are usually all that is required. But for corporate accounts, you may need to click on the "More Setting..." button to configure any additional security settings. Here, you should find out from your IT department or ISP if any additional steps are required. These include different port numbers, secure encrypted connection (SSL) or custom authentication scripts.

6

Finish the wizard and test your email. If you need to go back to tweak any settings, repeat steps 1 and 2, except choose "View" or "Change existing e-mail accounts" when the wizard opens.

Tips & Warnings
Using Outlook with Web-based email (such as GMail, Yahoo Mail, Hotmail) requires you to log onto those accounts via the Web, and configure the settings to allow you to use Outlook to send and receive mail.
If you travel, you will most likely have to change your outgoing (SMTP) server to reflect the requirements of the ISP you're using
.

How to reinstall factory operating system on different laptops

In this post I explain how to reinstall factory operating system on different laptops. This should work for most laptops running Windows Vista or Windows 7 operating systems.

This could be useful if your operating system stopped working properly, got corrupted or infected with a virus.

WARNING! Running system restore utility will erase all personal data on the hard drive and re-image it back to factory defaults. Make sure all personal data is backed up before reinstalling the operating system. Also, make sure the laptop is running on AC adapter power during the recovery process.

These days most laptops are sold without recovery discs. Instead they have a hidden (or visible) recovery partition with the factory image. In order to re-image the hard drive back to factory defaults it’s necessary to initiate the recovery wizard and it’s very similar for many different laptop brands.

As an example I’ll show step-by-step operating system re-installation process on HP laptops.

Again, it will be the same or very similar for other laptop brands.

How to start Recovery Manager on HP laptops.

STEP 1.
Turn on the laptop and press the F8 key when HP (or any other brand) logo appears on the screen.

STEP 2.
On the next screen you should see Advanced Boot Options.

If for some reason you don’t get this screen, restart the laptop and press on the F8 key again.

From all available options select the very first line: Repair Your Computer and press on the Enter key.


STEP 3.
This should take you to the System Recovery Options.

Select available language and keyboard layout. Press on the next button.


STEP 4.
On the next screen select your user name (must be user with administrative rights) from the drop down menu.

Enter the user password and press the OK button.


STEP 5.
This will take you to the next System Recovery Options window.

The last option will be HP Recovery Manager. Click on it.


STEP 6.
This will take you to the next window: HP Recovery Manager.

There are many different options here and one of them – System Recovery (Restore your computer to its original factory conditions).

Select this option and follow the instructions on the screen.


How to start Recovery Wizard on Toshiba laptops.

In order to start Toshiba Recovery Wizard you follow STEPS 1-5.

This will bring you to the same System Recovery Options with Toshiba Recovery Wizard at the end.

Click on the Toshiba Recovery Wizard button.


On the next scree you’ll see Toshiba warning about data deletion. Click the next button.


In the next Toshiba Recovery Wizard window you can select Recover to out-of-box state option.

Click on the next button and follow instructions.


How to start Backup and Recovery Manager on Dell laptops.

Here’s another example. Now it’s for Dell laptops.

Again, follow steps 1-5 and on the System Recovery Options select the very last option: Dell Backup and Recovery Managers.


This will take you to the next window where you can start the operating system re-installation process. Follow the instructions.

If you find this article useful, please consider making a donation to the author. Thank you!

Hard Disk Failure

Broadly speaking a hard disk can fail in four ways that will lead to a potential loss of data:
Firmware Corruption / Damage to the firmware zone
Electronic Failure
Mechanical Failure
Logical Corruption


Combinations of these four types of failure are also possible. Whether the data on the hard disk is recoverable or not depends on exactly what has happened to the disk and how bad the damage is. Please note that over time, all hard disks will develop bad sectors which can lead to data loss and drive inaccessibility.

1. Firmware Corruption / Damage to the firmware zone
Explantion: Hard disk firmware is the software code that controls, and is embedded in, the physical hard drive hardware. If the firmware of a hard disk becomes corrupted or unreadable the computer is often unable to correctly interact with the hard disk. Frequently the data on the disk is fully recoverable once the drive has been repaired and reprogrammed.

Firmware failures - How to diagnose: Common Symptoms
The hard disk will spin up when powered on, but be incorrectly recognised / not recognised at all by the computer
The hard disk will spin up & be recognised correctly by the computer but the system will then hang during the boot process

Actions to take
Recovering data from hard drives with firmware failure requires low level reprogramming / manipulation of the hard drive. It is not possible for a PC repair shop to do this. Data Clinic have our own specialist equipment that allows us to successfully recover data from hard drives with firmware faults.
What is the cause of firmware corruption? We believe that one cause of damage to the firmware zone on modern drives is the use of fluid bearing technology in the spindle motor assembly (PDF)


A Maxtor DiamondMax 22. Read about Maxtor hard disk problems and fault diagnosis

A Western Digital Green series hard disk. Read our Problems and fault diagnosis on Western Digital WD hard disks

All Fujitsu MPG series drives suffer from firmware faults. Read ourFujitsu MPG / MPF series hard disk problems page.

A Seagate Barracuda 7200.11 hard disk. Read aboutfirmware faults on these 7200.11 drives

2. Electronic Failure
Explanation: Electronic failure usually relates to problems on the controller board of the actual hard disk. The computer may suffer a power spike or electrical surge that knocks out the controller board on the hard disk making it undetectable to the BIOS.

Electrical failures - How to diagnose: Common Symptom
The hard disk will not spin up when the drive is powered on - it will appear dead & not be recognised by the computer

Actions to take
Data Clinic can recover data from all types of electrical hard drive failure.


Although electronic failures can happen to any type of hard disk, we find that Quantum Fireball drives are particularly susceptible to power spikes and quite often it's possible to see visible electrical burn damage around one of the chips on the controller board. Usually, the data on the hard disk has not suffered any damage and a 100% data recovery is possible.


The Seagate Barracuda (above) and the rubber sleeved 'U' series hard disks have unique failure symptoms. Fortunately, the data is often recoverable. Read our data recovery from Seagate section for further information


A Samsung hard disk drive. We see many of these drives with electrical failures. Read more about typical symptoms on our Data Recovery from Samsung hard disk page.

A Western Digital hard disk drive. Power spikes and likewise can cause damage to the components on the controller board. Read more about Western Digital hard disk failures


Popular drives that seem to develop controller board problems: Quantum Fireball series, Western Digital drives, Maxtor drives, Fujitsu MPG and MPF series. If you have a laptop hard disk - please also refer to our laptop hard disks problems page.

3. Mechanical Failure
Mechanical hard disk failures are those which develop on components internal to the hard disk itself. Often as soon as an internal component goes faulty the data on the hard disk will become inaccessible.

Mechanical failures - How to diagnose: Common Symptoms
When powered on, the hard drive will immediately begin to make a regular ticking or clicking sound

Actions to take
Recovering data from hard drives with mechanical failure requires the drive to be worked on in a clean room as the drive has to be taken apart and investigated in lab conditions. Data Clinic have a fully equiped Class 100 clean room which we use to recover drives with mechanical problems.

Note: We see many laptop hard drives with mechanical failure. Fortunately the data is often recoverable. For specific symptoms, please read our laptop hard disk failurespage


Do not be tempted to open a hard disk if you suspect a mechanical fault: there is nothing you will be able to do and you will contaminate the internal clean air environment. There is also a good chance that during this process you will destroy any chance that we have of successfully recovering the data.


External hard disks are often dropped or knocked. Read our section on dropped / knocked external hard disk drives


The IBM Travelstar (now made by Hitachi) is a typical laptop hard disk. All laptop drives can develop mechanical failure - click ourlaptop data recovery page for further details

A Seagate hard disk drive. Click here for further details aboutSeagate hard disk failures


A Hitachi Deskstar hard disk. A very common drive that it prone to developing mechanical faults


4. Logical Errors
Often the easiest and the most difficult problems to deal with, logical errors can range from simple things such as an invalid entry in a file allocation table to truly horrific problems such as the corruption and loss of the file system on a severely fragmented drive.

Logical errors are different to the electrical and mechanical problems above as there is usually nothing 'physically' wrong with the disk, just the information on it.

Microsoft Windows Based Problems: Four common types of logical failure are shown below - please click which one applies to you or call us on 0871 977 2525


The disk in drive <x> is not formatted

Recovering data lost after a Format or FDisk

Data recovery from Ghosted or imaged hard disk drives

Data recovery from hard disks involving Scandisk and Chkdsk

Recovering and restoring data from repartitioned hard disks drives


Logical errors can also be tackled with various software tools you can buy off the net, but be warned - if you are intending to run a fix utility on your disk you can very easily make recoverable data unrecoverable. This is especially true when running ScanDisk and Chkdsk on a damaged hard drive.

If Laptop Speaker Has No Sound

Step 1: Overview Most speaker problems are due to improper settings, speaker incompatibility or out of date drivers. This tutorial will familiarize you with some of the reasons speakers malfunction and discusses the measures you will need to take to fix your laptop speaker problem.
Step 2: Check the Volume Controls

Double click the speaker icon, next to the system clock in Windows System Tray located at the bottom right hand side of the screen. Adjust the Volume Control and Wave Balance by sliding the pointer up or down. To test the volume, run a .wav or .mp3 file.
Step 3: Access the Device Manager

Go to Start | Settings | Control Panel. Double click on the System icon to open up the System Properties window. Select the Hardware | Device Manager tab. Click on Sound, video and game controllers to expand the view. Select the sound card driver that you have installed on your Laptop and double click it.
Step 4: Read the Device Status
Double click on the sound driver to open up the Properties window. Click on the General tab to read the Device Status. If there is an error message in the device status, click on the Troubleshooter tab to fix the problem.
Step 5: Check the Configuration

If your sound card drivers are configured improperly or are damaged, your speakers will not function properly. You can rectify the problem by reinstalling the drivers from the disk that came with the speakers. You also can download most drivers from the manufacturer's web site.
Step 6: Update the Driver Click on Start | Run and type , now click OK. The DirectX Diagnostic Tool Window will open up. Select the Sound tab. You can view the Name under Device and the Provider under Driver. You can visit the Microsoft Windows Update Web site, http://windowsupdate.microsoft.com, to check the latest version of your sound card driver. You also can download most driver updates from the manufacturer's web site.

Laptop speaker makes crackling noise

Problem description:
One of the laptop speakers make crackling noise. Reinstalling the operating system and audio driver does not fix the problem.
Possible cause:

1. Failed laptop speaker.
2. Failed sound card.

Possible troubleshooting steps and repair solution:
If one of the laptop speakers started makig crackling noise, the first thing to do is test the laptop with headphones.

If both channels in headphones sound normal and crackling noise comes only from one of the laptop speakers, you have a faulty speaker and it has to be replaced.

If you hear same crackling noise from one of the headphone channels, most likely there is a problem with the laptop sound card. In most laptops the sound card is integrated into the motherboard. If the sound card fails, you’ll have to replace the whole motheroboard.

Tips for fixing common sound problems

Here are solutions to some common sound problems on your computer. These solutions can also help if you don't hear any sound coming from your speakers or headphones, or if there's a problem with the sound you do hear. For a step-by-step tutorial to help you identify and fix common sound problems, go to No sound in Windows.Hide all

I can't hear any sound from my computer.
Try using the Playing Audio troubleshooter to fix the problem. It checks for common problems with your volume settings, your sound card or driver, and your speakers or headphones.

Open the Playing Audio troubleshooter by clicking the Start button , and then clicking Control Panel. In the search box, type troubleshooter, and then clickTroubleshooting. Under Hardware and Sound, click Troubleshoot audio playback.‌ If you're prompted for an administrator password or confirmation, type the password or provide confirmation.


Note

To make sure you have the most up-to-date troubleshooters from theWindows Online Troubleshooting Service, your computer should be connected to the Internet. For more information, see Troubleshooting in Windows.

I've run the Playing Audio troubleshooter and I still can't hear sound from my computer.


Here are some simple steps that might help you fix the problem:

Check to make sure your computer actually has a sound card, or sound processor, and it's working properly.

You must be logged on as an administrator to perform these steps.


Open Device Manager by clicking the Start button , clicking Control Panel, clicking System and Security, and then, under System, clicking Device Manager.‌ If you're prompted for an administrator password or confirmation, type the password or provide confirmation.


Double-click Sound, video and game controllers to expand that category. If a sound card is listed, you have one installed. If no sound card is listed, check the information that came with your computer to see if there's supposed to be a sound card installed. If there should be a sound card installed, you'll need to install one. See Install or remove a sound card.


Notes


If you think you have a sound card installed but you don't see it under the Sound, video and game controllers category, expand the Other devices category and check any devices listed there.


Laptops don't usually have sound cards. Instead, they have integrated sound processors, which appear in the same category in Device Manager.

If there's a yellow question mark next to the name of the sound card in Device Manager, there might be a problem.

Right-click the name of the sound card and then click Properties.

Click the General tab, and then look in the Device status box to identify problems with the sound card.

If there's a problem, you might need a new driver for your sound card. For more information, see Update a driver for hardware that isn't working properly.

If you have speakers, make sure they're plugged into a working power source and turned on.

Make sure your speakers are correctly connected to the computer.

Many computers have three or more jacks that connect to a sound card or sound processor, including a microphone jack, line-in jack, and line-out jack. Your speakers should be plugged in to the line-out jack. If you're not sure which jack this is, try plugging your speakers in to each of the jacks to see if any of them produce sound.
Microphone, line-in, and line-out jacks on a typical desktop computer


Make sure that your speaker volume or headphone volume isn't muted or turned down too low. This is particularly important for laptops, which often have small speakers that can be hard to hear.


Open Volume Mixer by clicking the Start button , clicking Control Panel, clicking Hardware and Sound, and then, under Sound, clicking Adjust system volume.


Move the slider up to increase the volume.
Make sure the Mute button is not turned on. If the button looks like this: 
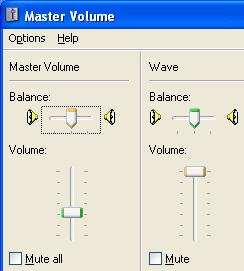
, muting is turned off. If the button looks like this: , click it to turn off muting.


Note

Some laptops have an external volume control on the outside of the case. If you're using a laptop, check the external volume control to make sure it's not turned all the way down.

Make sure your headphones aren't plugged into the line out (headphone) jack of your sound card or computer (unless you want to be listening with headphones rather than speakers). When you plug in headphones, most computers automatically cut the sound to the speakers.

If these steps don't solve the problem, check the information that came with your computer or speakers, or go to the manufacturer's website.

I'm having trouble installing my sound card and wonder if it's compatible with Windows 7.
To find out if your hardware is compatible with Windows 7, go to the Windows 7Compatibility Center. This website contains a comprehensive list of hardware and devices that have been tested to work with this version of Windows.

Sound from my speakers is crackling or distorted.
Make sure your speakers are correctly connected to your computer.

Many computers have three or more jacks that connect to a sound card or sound processor, including a microphone jack, line-in jack, and line-out jack. Your speakers should be plugged in to the line-out jack. If you're not sure which jack this is, try plugging your speakers in to each of the jacks to see if any of them produce sound.


In some cases, you can work around the problem by disabling optional speaker effects that are known as enhancements. If disabling speaker effects solves the problem, you might need to update your audio driver.

If these steps don't fix the problem, check the information that came with your computer or speakers, or go to the manufacturer's website.

I have a sound card in my computer, but Windows doesn't recognize it.
For Windows to recognize your sound card or sound processor, you must find and install a compatible driver. Most sound cards and sound processors require driver software to work properly. Here are three ways to find and install a driver:

Use Windows Update. You might need to set Windows Update to automatically download and install recommended updates.

Install software from the device manufacturer. For example, if your device came with a disc, that disc might contain software that installs a driver for the device.

Download and install the driver yourself. You can search for a driver on the manufacturer's website. Try this if Windows Update can't find a driver for your device and the device didn't come with software that installs a driver.

For instructions on how to do each of these, see Update a driver for hardware that isn't working properly.

I found a new driver for my sound card, but I'm not sure how to install it.
Windows Update can search for updated drivers and install them automatically, but if you already have a new driver you want to install, you can do this yourself.

Most drivers today are self-installing—after you download them, you can usually just double-click the file to begin the installation. Software included with your hardware usually contains drivers that are installed automatically, but sometimes you might have to install a driver manually. Here's how:

Open Device Manager by clicking the Start button , clicking Control Panel, clicking System and Security, and then, under System, clicking Device Manager.‌ If you're prompted for an administrator password or confirmation, type the password or provide confirmation.

Double-click Sound, video and game controllers to expand that category, and then double-click the device name.

Click the Driver tab, and then click Update Driver.

I'm having trouble getting a portable music player, microphone, or other audio device to work with my computer.

You can connect a microphone, portable music player, or other audio device to your computer by using one of the jacks on the front, back, or side of your computer. These jacks directly connect to your computer's sound card or sound processor.

Most desktop computers have at least one line-in jack to connect a music player or other audio device and one line-out jack to connect speakers. These jacks typically appear on the back of a desktop computer. Many desktop computers also have a microphone jack, which is often on the front of the computer.

Most laptops don't have line-in or line-out jacks, but usually have microphone and headphone jacks located on the front or side of the laptop.

If you don't hear any sounds coming from an audio device you've plugged in to one of these jacks on your computer, check to make sure the jack isn't muted.
Microphone, line-in, and line-out jacks on a typical desktop computer

For more information, see Connect a microphone, music player, or other audio device to your computer.

I've tried all the solutions here and still can't get my sound to work properly.

Some sound problems can't be solved by the solutions listed above. For example, problems can occur with specific models of hardware, such as a certain sound card, music player, or headset. It might help to check the Microsoft Support website to see if it contains any information about your sound hardware.

If you're stuck, here are some webpages to start with:

USB speakers

Sound cards

Microphones

You can also check for support information on your hardware manufacturer's website. The manufacturer might have information about problems with your specific model of computer or sound card:

Dell support

HP support

Lenovo support

Creative support

Turtle Beach support